Sunday, August 8, 2010

Breeding ghost shrimp(Palaeomonetes patulous)

Breeding and Raising the Ghost Shrimp
Palaeomonetes patulous
By: Corydora_FREAK
All photos by author except as noted
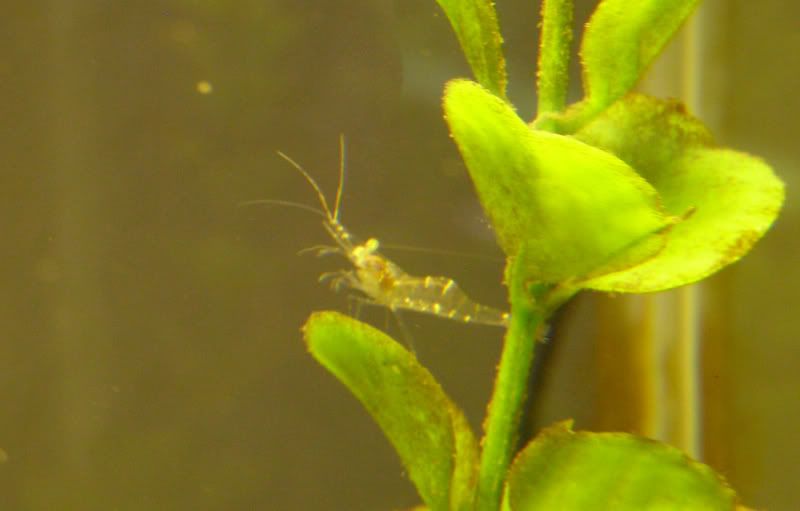

Adult Male Ghost Shrimp

The Ghost Shrimp has been a staple in the aquarium hobby for many years, and I am always hearing questions on how to get them to breed in an aquarium. I have had great success not only getting them to breed, but also raising the fry, which seems to be the most challenging part of it all.


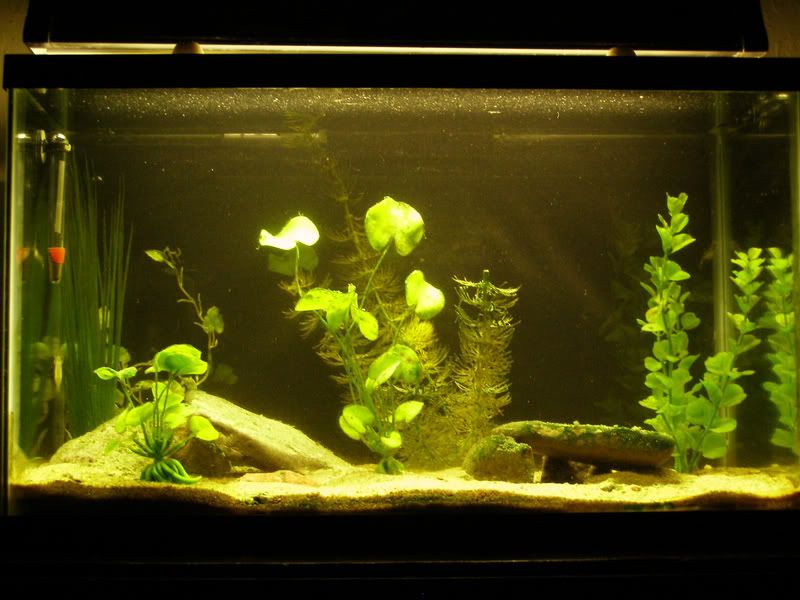
The Ghost shrimp is really a ready spawner in the home aquarium, but like any animal, conditions need to be right or you will not get anything. I keep my Ghost Shrimp in a 10 gallon tank all to themselves simply because these small animals are prey to almost all tropical fish, and they will not produce eggs if they feel threatened.

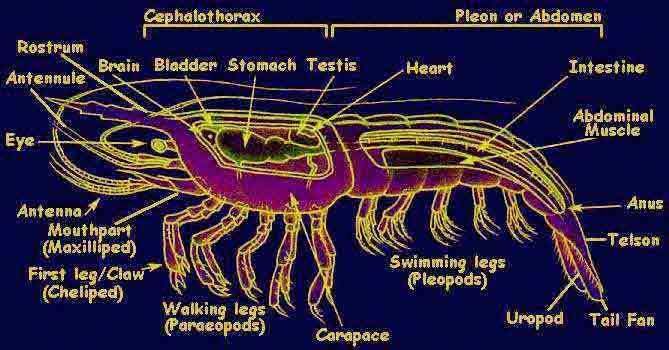
Anatomy

Before we get started lets review on some Ghost Shrimp biology.


The Shrimp Tank
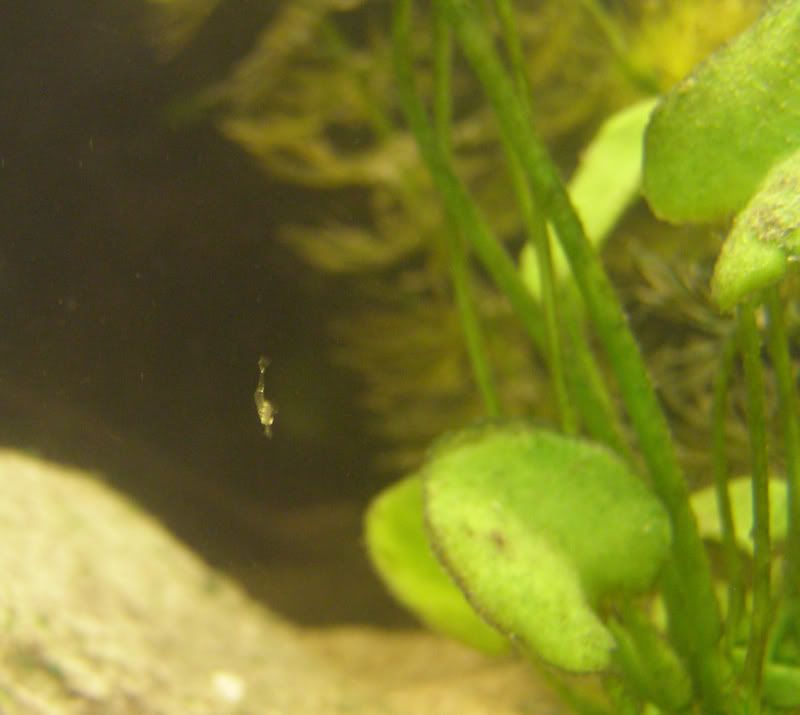


Larval Shrimp

Getting Started
The reproductive cycle will not begin if you don’t have 4 things for the shrimp
Security: they wont breed if they are threatened by predators
Males and Females: Seems obvious right? Can you sex your shrimp? Well Yes, you can! And it’s rather easy! Although it is almost impossible until the shrimp are full grown. The female has a much larger body size full grown, she will max out at about an inch and a quarter, while males stay much smaller at about 3 quarters of an inch, and they also have a much slimmer body style, the females tail and pleopods will be much larger to accommodate the eggs. Unlike most fish, you can have a relatively low number ratio of males to females. I have 1 male fertilize 2 females.
The Water parameters: As with breeding any fish or invertebrate, you need 0 Ammonia, Nitrite, and as close to zero as possible on Nitrates. Shrimp are very delicate and need matured substrate and clean water to thrive and in turn, breed. The temperature needs to be 73-78 degrees Fahrenheit or 20-30 degrees Celsius. Keep the salinity low, I use one teaspoon of aquarium salt for 10 gallons. Very small amounts.
Readiness of Food( but feed properly!) The shrimp breed in the abundant seasons in the wild, if they have plentiful food sources it will greatly increase the chances of eggs to be laid. I cant stress enough the importance of NOT overfeeding!! A great way to give your shrimp plenty to eat is to let the algae grow on the ornaments like rocks( but you don’t have to let it overgrow, a little is all you need, not a forest!), they love to eat it off, although they are NOT entirely algae eaters and you will need to supplement their diet with protein and calcium to and that can be found in bottom feeder pellets. Remember these are small animals and a little goes a very long way. Take a quarter of the bottom pellet and crush it the size of crumbs, then put it in, that amount will sustain my 3 full grown shrimp for about 2 days depending on how hungry they are

So, we have eggs!

The female shrimp will lay anywhere from 20 to 30 eggs and carry them on her enlarged pleopods for 21 to 24 days. The eggs look like little black dots under all over her pleopods. When fertilized the eggs will become clear. Over the 21 day incubation period, the eggs will stay clear until the last 4 or 5 days, then you will actually notice little black dots on each of the eggs. This is the larval shrimps eyes! When you can see eyes, you know the hatch is coming very soon. Turn off your filter and pull out the intake tube if you have a power filter as the young shrimp will be sucked to their doom, they need still waters.


Notice the black eggs under her abdomen.

After the 21 to 24 days the eggs will then hatch and the young will still be clung to the female’s pleopods. The mother will swim up into the water column and rapidly paddle her pleopods to release the larval shrimp into the water column, she will not release all the young at once because she is vulnerable to predators in the wild, and lets face it they think they are in the wild. She will make many intervals to shake loose all the larvae. Do not disturb her if you happen to witness this as she will take cover instead of releasing the young and they will die under her if they stay for more than an hour as they need to get out and get food.

Larvae!!!

So the eggs hatched and the larvae are out and free swimming! Alright, now the real work has begun. Before I continue I would like to state that a third or more of the larvae may die from lack of food or predation by parents. Now, the fry have enough energy to survive without food for only an hour or two, they are not born with yolk like fish to survive, and they will immediately start to forage for food. The larvae have no legs (paraeopods) so they will be swimming in a vertical position with heads down. They are extremely small, but will grow very fast. They will double in size in 4 to 6 days depending on the nutrition they receive. What do the larvae eat? The answer, infusoria. Infusoria are bacteria that digest plant matter and will be plentiful in a cycled mature tank with algae or live plants. They are highly nutritious and will be the larvae’s food, after just 2 days they will then begin to eat algae as well. Mine tend to love the thin layer on the glass, they can use their extremely tiny budding legs to hold on to the algae and eat their fill. Remember they cant walk, only propel themselves along with their tails. They are usually skittish and if you walk by and get close they will use their tails to jet them away from you to the nearest cover. Its rather funny to see the little specks dashing around so fast. Remember, keep clean water since the filter is disconnected, do a 10 percent water change every day! Now lets take a look at some larval shrimp!
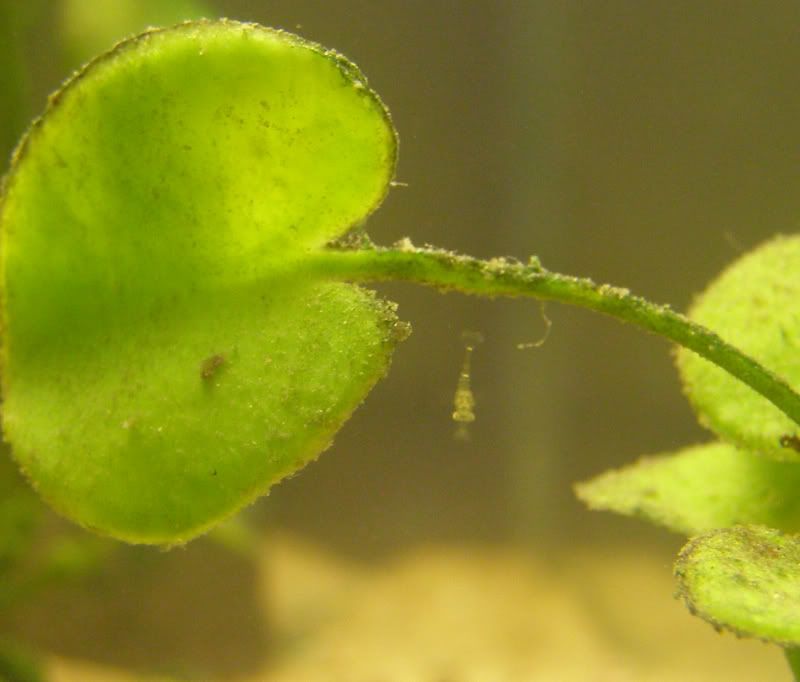


This shrimp is brand new, as it was shaken loose from its mother only 6 hours ago, all your larvae will adopt this up and down position as they have no legs to walk, They will drift around engulfing food as it drifts by. This is why its crucial that you have the tank for the shrimp only, these floating young would be easy targets for fish.
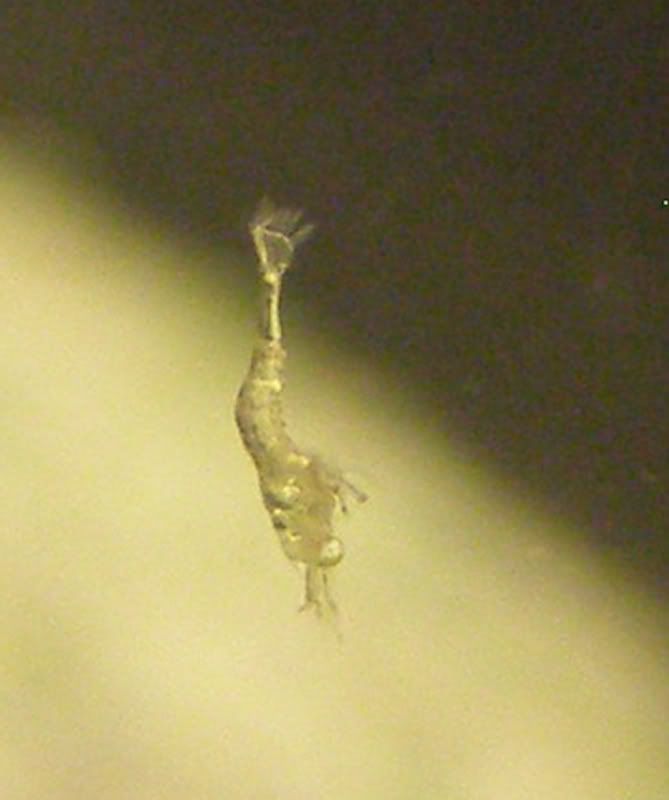


Up close with the larvae, see the underdeveloped legs the absence of pleopods. Don’t worry, they will come in extremely quickly, in anywhere from 3 to 5 days.

Grow shrimp, grow!

Ok so your shrimp larvae have survived the first crucial week! Ok, the hard part is over! Now after 1 week they are called juveniles. Their legs will have grown in and they will now forage as miniature adults. If you think you lose one because you cant find it, don’t fret, remember these creatures are extremely small still, and remember their coolest quality, transparency. So don’t worry they are probably just hiding. After 2 weeks have passed they will be miniature copies of the adults and will grow rapidly. They will reach adulthood in 5 weeks.

Well I would like to thank you for taking the time to read this, I sure hope it helps and if you have any further questions drop me a line, though PM or this thread.


Mother with 2 week old juvenile __________________

from
Corydora_FREAK at FishForums.com:


Friday, July 23, 2010

How to tell why your fish dead?

Why the fish jump out on the floor and become a Dried fish without your notice? or
Why is there always some floating dead fish on the water surface?
Why, why, why...........!!
__________________________________________________________

Why aquarium fish die......

ANDRE'S AQUARIUM PAGES
M
Click here to stop or start music!

Aquarium Doctor
Why aquarium fish die......

Normally, an alert aquarist can see the symptoms (frayed fins, cloudy eyes, unusual behavior, water test results) of a problem before a death occurs, but ocassionally a fish will die suddenly with no apparent reason. Barring the possibility of a fish becoming infected and dying from the West Nile Virus, below are the most probable reasons for a tank critter to die.
One characteristic, next to passion for the hobby, every aquarist should have or obtain, is patience.
Patience, next to understanding the basic water parameters, will be put to the test while cycling a tank. And cycling by all means, not only during the fresh set up of a new tank. An established aquarium can cycle at any time, depending on severe changes of the bioload, filtration failure, or any loss of nitrifying bacteria, or adding new animals.
The cycling process starts the aquarium. Since an aquarium is an artificial and fragile ecosystem it requires our “interference” in order to thrive. Our interference starts with providing an “artificial” filtration system. In short, creating an environment as close to nature as possible.
"nitrosomonas bacteria"
This is the most important life in your aquarium! 
Requiring oxygen to survive. Many bacteria must have a suitable supply of oxygen to be able to survive and thrive. Bacteria such as nitrosomonas and nitrobacter are aerobic and must be supplied with a constant flow of oxygen in the water to create suitable populations able to remove the ammonia and its by-products produced within the aquarium.
Ammonia Poisoning
Occurs most frequently while cycling a new tank, but also happens during collection, while in transit or adding a new animal.
If the tank has been fully cycled for a period of time, New Tank Syndrome may be the cause.
Symptoms include cloudy eyes, frayed fins, rapid gilling and lack of appetite.
Nitrite Poisoning
Almost always occurs while cycling a tank.
The symptoms are similar to ammonia poisoning.
Cyanide Poisoning
Almost exclusively occurs in fish captured in certain areas of the South Pacific.
May take a week or two to show up after collection.
Other than a lack of appetite, there are few symptoms to detect.
Poisonous Sting
May be inflicted from a poisonous fish(i.e. Lionfish) or from a poisonous anemone.
Difficult to diagnose.
Symptoms include erratic behavior and lack of appetite.
Other Poisons
Poisons from the Neutron Bomb Boxfish, Pufferfish or Lionfish which have been released in the tank.
Anything from cigarette ashes to hair spray can be sources.
Malnutrition
Most often occurs when a new fish is introduced into a tank.
Lack of appetite due to disease.
First symptom is a sunken belly.
Oxygen Deprivation
Normally caused by lack of vertical water movement in a tank. (Fish need aeration from air pump).
Initial sign is fish staying at the surface of the tank water.
Old Age
Inevitable.
Difficult to diagnose.
Physical Injuries
Pretty obvious.
Usually caused by other tank occupants.
Bacterial Infection
Symptoms include cloudy eyes, red areas on the body, swollen belly (internal infection).
Bends (Diver's Disease)
Rare for the hobbyist to see.
Normally occurs during collection.
Other Diseases
Ick, fungal infection.
What information do we need? Ick=Small white pin head spots, fungal=white fuss

Table 1 shows the most basic necessary information needed when investigating health problems:
Table 1: Basic health work-up Investigation
Reason
1. Size of pond / tank. Number and size of fish and type of filtration system
This tells us stocking densities and whether the filtration is adequate. As stocking densities increase water management and filtration become more important
More Information
2. Any new additions. Any treatments carried out in last 4 weeks
This may indicate a transmitted disease, or a toxicity problem related to disease treatments.
3. Behaviour over the last few weeks and days
This may suggest the possibility of certain health problems such as water quality, parasites etc.
4. Are the problems affecting all the fish or just one or two individuals
If more than one or two are affected it will probably indicate a contagious condition and / or environmental problems
5. Have they been suddenly affected within a short period - usually days?
An acute problem usually indicates a serious water quality problem or poisoning, especially if an examination shows no other disease signs
6. Are the problems chronic - an ongoing problem affecting them over a period of a few weeks
This could indicate parasites, bacterial problems or a background water quality problem
7. An examination in the water to check behaviour, respiratory rate and any obvious physical damage
This gives a very basic indication of what sort of disease problems might exist
More Information
8. Carry out water quality tests for ammonia, nitrite, pH, water hardness and history if available
These may indicate a core water quality problem or toxic conditions
More Information
9. Water tests for nitrate, phosphate and dissolved organics
These may indicate background pollution, poor maintenance or inadequate filtration
More Information
10. Examine system, including filter, for water clarity, algae growth, solid wastes:
This may indicate possible pollution sources; whether photosynthesis is affecting pH or oxygen levels and whether the system is poorly maintained
More Information
11. Examine a fish out of the water, usually while it is sedated. It is not possible to examine a fish while it is still in the water. Check skin, fins, eyes, mouth, body and gills
We are looking for lesions, reddening of the skin, fin-rot, visible parasites, the colour and condition of the gills and any other visible signs of disease. See anesthetics pages
12. A skin scrape, during which a small amount of mucus is carefully removed with the back of a scalpel or wooden spatula, so as not to damage the epithelium. The sample is then examined under a microscope.
This examination will show whether parasites are present; what sort and how many. The best sites for sampling are just behind the operculum and along the back at the base of the dorsal fin.
More Information
13. A gill biopsy or gill swab should be taken. The biopsy or swab is then examined under a microscope
This will show whether parasites are present in the gill; what sort and how many. It will also give some indication of the condition of the gill.
14. If possible take a fecal sample for microscopic examination
It may show signs of internal parasites
Print out your own fish health work-up form
With all of this information regarding the physical condition of the fish and the environmental conditions it is, in most cases, possible to determine both disease and the cause. From this we can decide what actions and what treatments are needed.
If this basic examination is inconclusive it may be necessary to carry out further investigation which could involve post mortem investigations of recently dead fish, bacterial sampling from lesions to determine the type of bacterium involved and their antibiotic sensitivity, histological examination which involves preparation and examination of body tissues and organs for signs of malfunction and disease.
Although this may all look involved and unnecessary the success rate of this type of methodical approach to fish disease diagnosis is far, far higher and usually a lot cheaper than either guessing or making simplistic diagnosis that only treat the obvious effects and not the cause.
"nitrosomonas bacteria"
This is the most important life in your aquarium! 
Requiring oxygen to survive. Many bacteria must have a suitable supply of oxygen to be able to survive and thrive. Bacteria such as nitrosomonas and nitrobacter are aerobic and must be supplied with a constant flow of oxygen in the water to create suitable populations able to remove the ammonia and its by-products produced within the aquarium.
In this part of the website, you will also find out how to take care of algae problems, what to feed your fish, what the proper water parameters are, and many other good techniques to keeping your fish and invertebrate happy and healthy. With this information, members will have a much better understanding of keeping their tank.

from: http://www.aquapages.info/Page20.htm 

Saturday, July 17, 2010

3 只鬼鬼虾!噢耶!~GHOST SHRIMP. ~~99cents/each~

Ghost Shrimp


Ghost shrimp are a very suitable name for this species which is totally transparent. They walk on the bottom and plants collecting small food particles which they then eat. You can see the food in their stomach after they have eaten it. Their feeding habit make them great cleaners that can help keep an aquarium clean.

Ghost shrimp are somewhat aggressive towards other Ghost shrimp and the large shrimp can become very aggressive toward small shrimps if too many shrimps are kept together in the same aquarium. So what is to many shrimps?

A suitable amount of shrimp is no more than 1 shrimp per gallon / 4 L of water. It is recommendable to keep them in lower concentration in aquariums smaller than 10 gallon/ 40 L.

They can grow to 1.5 inch / 4 cm (the males seldom reach more than 1 inch / 2.5 cm) and become up to two years old. They moults into new exoskeletons every few months as they grow. They are very vulnerable the first time after moulting before their new exoskeletons harden. It is therefore important to provide your Ghost shrimp numerous hiding places.

Suitable companions for ghost shrimps include small Livebearers, small Tetras, Rasboras, small Danios and other fish that are small enough not to eat the ghost shrimp. Avoid keeping them with very aggressive fish.


Ghost 
Shrimp
Ghost Shrimp - Pictures by Goshawk
Ghost shrimp are best kept in an aquarium with a water temperature of 65-82 F / 18-28 C. Decorate the aquarium with a lot of hiding places that are too small for other fish to get in it. One way to create such hiding places is to put small flower pots upside down on the bottom. You can in most other aspects decorate your aquarium according to your own preferences or according to the demands of the other fish in the aquarium. Plants are not necessary but I personally think it is more beautiful if the Ghost Shrimp have plants to climb on. Make sure that all the decoration is none contaminated.

Ghost Shrimp are scavengers and will accept just about any small food they find while they scan the bottom for food. They sometimes also swim upside down and eat food from the surface. Ghost shrimp are very easy to feed and will do well on a diet of flake food. It is however good to offer them some variation in their diet and for example offer them some frozen food once in a while.

Ghost shrimp are easily bred in aquarium but the fry is very hard to raise. You will see female ghost shrimp with pink eggs or baby shrimp under their bellies. The fry is however hard to feed since it is very hard to offer them food that are small enough. Feeding them infusoria can sometimes be successful. Ghost shrimp are better and more easily breed and raised in ponds where there exist a lot of food for the young shrimp. Adding a few females and one or two males in a pond usually results in a lot of shrimps in a couple of months.

Ghost shrimp are a great addition to any aquarium with small enough fish for the shrimp to be safe from being eaten and are great little helpers in keeping your aquarium clean and your water quality high.

Tuesday, July 13, 2010

Halfbeaks didn't survive in a regular heated aquarium.

regular heated aquarium:

tap water ->  aqua + -> 28`c ->
http://en.wikipedia.org/wiki/Halfbeak

Wednesday, June 30, 2010

Aquarium Light

Aquarium lighting

From Wikipedia, the free encyclopedia

Jump to: navigation, search
This article does not cite any references or sources.
Please help improve this article by adding citations to reliable sources. Unsourced material may be challenged and removed. (January 2008)
Aquarium lighting describes any type of light that is used to illuminate an aquarium tank or in some instances, such as with reef aquariums, support the life contained within.

[edit] Freshwater

Freshwater aquarium lighting often comes in two forms; one is a screw-in style incandescent bulb and the other is normal output fluorescent lighting. Screw-in compact fluorescent lighting is also used in freshwater aquaria since it provides brighter light output than traditional screw-in style bulbs.
More demanding freshwater set-ups, such as planted freshwater aquariums, may require stronger light sources. Compact fluorescent bulbs, high output T5 bulbs or metal halide lamps are often used over such aquariums to encourage plant growth. While these lights can provide a better spectrum than traditional ones, they often use more electricity and have a high heat output.
 clipped from www.fishlore.com

Aquarium Lighting - Fish Tank Lighting

One important aspect of keeping tropical fish is aquarium lighting. This is an often overlooked area that can sometimes be confusing for a beginner to aquariums. The confusion may come from the many available types of fish tank lighting that you can use to light your tank. The main types of light are:

  • regular fluorescent lights,
  • compact flourescent,
  • high output (ho) flourescent,
  • very high output (vho) flourescent
  • metal halide
  • LED - Light Emitting Diodes
The type of light you need for your tank really depends on what you plan on keeping in your tank. This article is a very general introduction into aquarium lighting and below we discuss the various types of lighting needs based on aquarium type. These are general recommendations and we encourage you to research your livestock's lighting requirements for best results.


Light Spectrum
Spectrum of visible light expressed in nanometers (nm).
Aquarium Light Types

Regular Flourescent Light
These are the type of lights that come with most starter tanks and are very affordable. They typically range from 15 to 40 watts and have Kelvin ratings from 3,000° to 10,000°. Kelvin is the scale used to measure the color temperature. They are very cheap to run and replace. Compact Flourescent Light Bulb
These are a step up from the regular flourescent lights. They typically range from 10 to 100 watts and have Kelvin ratings from 5,000° to 10,000°. They offer really bright and intense light but they do put off some heat that may raise the tank water temperature. Running power compact lights will require special hoods and because of the heat produced, they often come with installed fans in the hood.
High Output (HO) Flourescent Light
HO flourescent lights typically range from 20-60 watts and have Kelvin ratings from 6,000° to 11,000°. They are more expensive than regular flourescents and usually last longer. These lights require a T5 light fixture.
Very High Output (VHO) Flourescent Light
VHO flourescent lights typically range from 75-160 watts and have Kelvin ratings from 10,000° to 20,000°. These lights are very expensive and produce a lot of heat. They require a ballast and/or special fixture especially for VHO lights. They have fans incorporated into the lighting unit to help keep the lights and aquarium cool. Even though they come with fans you may need to equip your tank with an aquarium chiller to prevent your tank water from overheating.
Metal Halide Light Bulb
Metal Halide lamps typically range from 175-1000 watts and have Kelvin ratings from 5,000° to 20,000°. This type of light is closest to the sun in terms of luminousity but they are very expensive to buy, operate and replace. They produce a lot of heat and usually must be fan cooled. Ballasts with fan units included are widely available. This is often the preferred method of lighting a reef tank setup with anemones and corals that need higher intensity lighting.
LED Aquarium Lights
Is this what we have in store for the future of aquarium lighting systems? Prices as of 2007 are still very high and they will need to drop significantly in price before more hobbyists will transition to them. They offer many advantages over previously mentioned lights. Some of the advantages of LED lights over convential flourescents and metal halides include:

  • LED lights run much cooler than standard flourescents and metal halides
  • LED lights consume less energy than the other lights
  • They have a much longer life span
  • There is no filament to break, so they could be considered more durable
  • They can be configured in many ways due to their small size.
Many of the light fixtures being sold now include moon lights which are LEDs. So we're starting to see them more often, but even though these LED's are very promising we are probably still a few years away from using them as the primary light source on most home aquariums.
Freshwater Aquarium Light - Fish Only
For a freshwater tank with no live plants you can get by with the low watt flourescent lights. These lights are typically between 18 and 40 watts and should last for a year or longer before they burn out. Freshwater Aquarium Plant Lighting
Live plant keepers will need to upgrade their lighting system. The light type you need depends on several factors:
  • Depth of the tank
  • Plant species you plan on keeping
  • Growth rate desired

Typically, plant keepers try to provide anywhere from 2-5 watts per aquarium gallon. Research the plants you want to keep beforehand to determine if you can provide the light needed. Saltwater Aquarium Light - Fish Only
Fish only saltwater tanks will work fine with regular flourescent bulbs. Try to get a "full spectrum" light for your tank.
While tanks with live rock can get by with regular flourescent full spectrum lights they will do better with flourescents and actinic lights (blue light). It really depends on how well you want the coralline algae to grow. Certain types of coralline algae seems to grow better with higher amounts of actinic lighting.
Saltwater Reef Aquarium Light
Saltwater reef tanks with corals, clams and other light needing organisms will need the high output, very high output flourescent or metal halide lamps. Certain corals, anemones and clams require very intense lighting levels that can only be provided with VHO and metal halide light sources. A general rule of thumb for reef tanks is between 4 and 10 watts per aquarium gallon. Many reefers have lighting systems incorporating metal halides and VHO flourescent tubes. Research the species you want to keep because light requirements can vary. Because of the amount of heat these light units can produce, you may need to get an aquarium chiller to keep your tank water temperature in an acceptable range. The expense of lighting a reef tank may be just as high or higher than the cost of the live rock.
Photo Period - How long do you leave the lights on?
How long should the fish tank lights stay on for? We get this question frequently. A good range to aim for would be anywhere from 6 to 12 hours. Remember that fish like and need to rest just like other animals. Fish only setups could range from 6 to 12 hours, reef tank setups and freshwater planted aquariums could range from 10 to 12 hour photo periods. Leaving the lights on for longer time periods could contribute to nuisance algae growth (just one of the factors with algae growth), higher tank temperatures and quicker tank water evaporation. Be consistent and if you can afford it, invest in a light timer.
Aquarium Light Timer
You may also want to get an aquarium light timer. A light timer can help make running an aquarium that much more enjoyable because it's one less thing you have to mess with. Most higher end fish tank hoods and fixtures have multiple power cords that are tied into the multiple light sockets within the hood. This allows you to setup your timer to turn on the various lights at different times.
For instance, a popular hood nowadays is the compact flourescent hood incorporating an actinic bulb, a full spectrum bulb and a moon light. You could set up the timer to turn on the actinic bulb to go on first and stay on for 12 hours, then have the full spectrum bulb come on an hour or so later and stay on for 10 hours. This could simulate dawn and dusk by having the actinic bulbs come on an hour early and stay on an hour later. Finally, you could have the moon lights turn on when the actinics turn off. Who knows, you may even start to see breeding behavior in certain species that may be more in tune with the light of the moon in this type of setup. Another side benefit of using a moon light is the super cool effect it creates in the aquarium when all the other lights in the room are off.
Conclusion
As you can see, the type of light you need really depends on they type of tank your running. Freshwater and Saltwater fish only tanks can usually get by with the regular flourescent lights whereas the freshwater plant keepers and saltwater reef tank keepers will need to invest in better light sources.
Please practice good aquarium electrical safety and be sure to use drip loops and gfci outlets!

How Long Should Aquarium Lights be Left On?

By , About.com Guide
Question: How Long Should Aquarium Lights be Left On?
Answer: The ideal 'photo period', or length of time the aquarium lights are on, ranges from eight to twelve hours, depending on the aquarium setup. Generally ten hours a day is a good average for most aquariums.

Reducing the Time
If algae is a problem in the tank, a contributing factor is usually too much light. Reducing the time the aquarium lights are on to eight hours, or a bit less if necessary, will help reduce the algae growth.

Some fish prefer lower lighting conditions. Many cichlids thrive on less light, as do many species of the tetra family. If the room has good ambient lighting, it's possible to reduce or even eliminate additional aquarium lighting.

Increasing the Time
If there are live plants in the aquarium, the aquarium lighting period should be increased. Plants require as much as twelve hours per day, however the time will depend on the aquarium setup and species of plants.

Use a Timer
The biggest obstacle in maintaining uniform aquarium lighting is that owners aren't able to turn the lights on and off at the same time each day. Fortunately there is an inexpensive and easy way to remedy that problem.

Purchase an inexpensive timer and plug the lighting unit into it. Set the on and off times to obtain the desired period of light, then cross that task off your daily 'To Do' list permanently. I highly recommend timers for all aquarium owners.

Tuesday, June 29, 2010

Heater Reviews

Fluval E Series Heaters


digital thermometer and digital heater in one package

They also come with a side bracket that in my case was very useful for mounting on the side but turning the heater so they face towards the back of the tank for easy reading.


------------------------------------------------------------------------------
Hydor ETH Inline Heater


Advantages:

temperature hasnt fluctuated one degree in 7 months.
a step up and more modern


--------------------------------------------------------------------
Ebo-Jager brand of heaters

advantage:

 eeping my tank at a solid 78.9 degrees
solid temp
Keeps the temperature consistant. 
one for well over 10 years
had a 75 watt one for over 10 years and it just stopped working this year.

disadvantage:

rather large. 


-----------------------------------------------------------------------

  Tank Size     Watts     Length  
  10-15 gal.   50w 9"
  15-20 gal.   75w 10"
  20-30 gal.   100w 12"
  30-45 gal.   125w 12"
  40-60 gal.   150w 13"
  60-90 gal.   200w 15"
  >90 gal.   250w 17"

How to use Undergravel filter?

Under Gravel or Undergravel Filters

Filtering Your Aquarium Water

What Is an Under Gravel Filter?

Under gravel filters are any filters where the water is drawn through the gravel as the primary filter media. The portion of the filter you will purchase is a plastic grate that keeps the gravel off of the bottom of the tank, lift tubes to deliver water, and power heads or an air pump to move the water.

How Does an Under Gravel Filter Work?

Under gravel filters consist of a plastic grate or "filter plate" which lies under the gravel of the tank. This plate allows water to flow freely under the gravel. Water is drawn through the gravel (which acts as a mechanical and biological filter). To move the water, you can use either power heads or air pumps. A power head will pump water out of the top of the lift tube and into the tank, and air pump will blow bubbles at the bottom of the lift tubes and the bubbles will lift Under Gravel Filter Diagram water up the lift tube and into the tank. As water is moved out of the lift tube, it is replaced with water from under the filter plate, which in turn pulls water through the gravel where it is cleaned. The gravel it self provides mechanical filtration by catching large free-floating particles. The gravel, as well as the filter plate, tank bottom, and lift tubes, provide a bed for the bacteria of a biological filter. Under gravel filters primarily provide biological filtration.

What Maintenance Does an Under Gravel Filter Require?

With an under gravel filter you neither have to nor want to change your filter media. However, you will need to clean the gravel regularly. The easiest way to do this is by using a gravel vacuum and cleaning 1/4-1/3 of the gravel each time you do your weekly water change. This is necessary to prevent the gravel from "channeling," where the debris collecting in the gravel blocks some passages and forces the water through channels, resulting in decreased water flow and reduced exposure to the bacteria that clean the water. Under gravel filters are generally the lowest maintenance filters and are the cheapest to keep running.

What Should I Be Aware Of with an Under Gravel Filter?

Some under gravel filters come with carbon cartridges that fit the top of the lift tubes. These are unnecessary and can be dangerous. There is not enough carbon in these cartridges to provide sufficient chemical filtration, if you are running your filter with an air pump, you are not moving enough water through the carbon to provide good chemical filtration, and the carbon will restrict (and may even stop) water flow through the filter. Additionally, when the carbon becomes saturated, it is possible for it to begin to release other toxins into your tank. If you do decide to use carbon cartridges with your under gravel filter, you should replace them at least three times a month. Remember to remove any carbon from the tank or filter before you medicate (if the carbon is working, it should remove the medication from the tank in under an hour, in which case your fish won't get treated).
Also remember that water will follow the path of least resistance. If there is an area of the filter plate that is exposed, or if you have a power head on one side and an air stone on the other, you may not have any filtration from your under gravel filter.
Under gravel filters, when properly maintained, provide efficient biological filtration and adequate mechanical filtration. I would strongly recommend an under gravel filter for the first filter in a basic tank. You don't have to tear up your tank to clean your filter with an under gravel filter, because to clean it, all you have to do is siphon off the accumulated debris in the gravel when you do your regular water change.
Though some people claim that under gravel filters are unreliable or even dangerous, these claims are unfounded, unsupported, and irrational.